Manage Cloud Exchange
Cloud Exchanged will be discontinued on 31/12/2020
In order to continue receiving e-mails sent to your domain name, transfer Cloud Exchange to Proximus Mail.
Where can you manage your Cloud Exchange users and e-mail addresses, and what can you manage? Log in to Cloud Exchange for an overview of all the functions.
Log in to Cloud Exchange
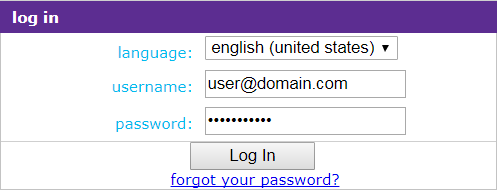
- Surf to Cloud Exchange.
- Select your language: English (United States) in the drop-down menu.
- In the Username field, enter your username. Your username can be found in the e-mail you received from us after registering for Cloud Exchange.
- In the Password field, enter your password. Forgotten your password? Create a new password for Cloud Exchange.
- Click Log in.
You are now logged in to Cloud Exchange.
First steps
Via the control panel, you can manage Cloud Exchange. Below is an overview of the main functions.

- In the main menu, you have quick access to all the main categories described below.
- Organization: here you can enter your contact details and the e-mail address on which you wish to receive alerts.
- Users: here you will find all the data concerning your users, user groups, e-mail addresses, and aliases, and you can send e-mails to one or more users. As the administrator, here you can reset passwords or log in as a specific user to install Outlook, forward e-mails, or activate an Out of Office.
- Hosted exchange 2010: here you can create distribution lists to send e-mails to a group of people, manage your address books, change your mailbox limits, or set general rules for your users and e-mail traffic.
- Reports: displays the actions of users in the control panel and allows you to download .csv reports indicating the used disk space, number of mailboxes or folders, shared calendars and contact persons, etc.
- Preferences: here you can set general rules for auto log-in, e-mail classification, name display, etc. and change the style and logo of the control panel.
- In the navigation menu on the left, you have quick access to all the main and sub-categories described above.