Securing your business and employees against cyber threats

  • What is MTD?
  • Accessing the portal
  • Get started as administrator
  • FAQ's

What is MTD?


MTD or Mobile Threat Defense secures your users' smartphones against cyber-attacks and threats. The MTD app protects them from scammers who try to obtain personal information via text messages, email, social media or applications and attacks that can affect the network, system or applications. A manual for your end user can be found at www.proximus.be/mtduserOpens a new window . Through the secure MTD portal, as an administrator you set this option for your end users, you define corporate policies and you manage threats as they arise.

Intereseted? As administrator for your company, ask your Proximus contact or partnerOpens a new window to add MTD to your contract. You will then received all the information you need about activation and management.


Accessing the portal


After activation of the MTD option, a welcome email is sent to both the end users and the administrator(s) of the mobile contract. As an administrator, you can use the welcome email to activate and install the MTD app on your own device on the one hand and activate your account on the MTD portal on the other. Want to know how to get started with the MTD app on your own device? Read our user instructions to protect your smartphone from scamsOpens a new window .

To activate your account on the MTD portal as an administrator, you will need the welcome email. You will receive it at the email address you provided on the order form. If you have not received an activation email, please check your spam or junk folder.
Did you receive the activation email? Keep it at hand, we'll explain what you need to do:

  1. Open the welcome email on your PC.
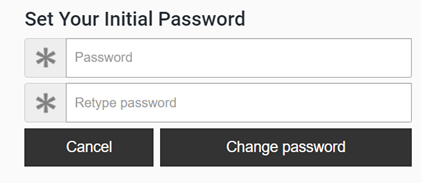
  2. Click on the link in the email and request a reset of your password through the MTD portal. Please note you need to choose a new password within 24 hours of receiving the email.
  3. Enter your newly chosen password and confirm it a second time.
  4. Using the Portal link, you can now access the MTD portal with your email address (USERID).

Get started as administrator


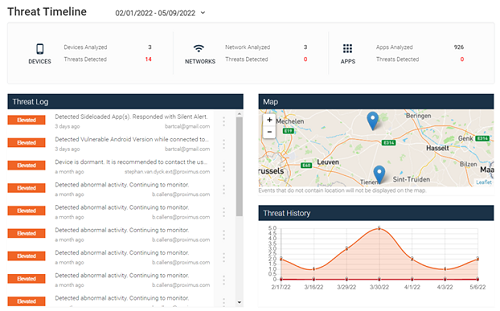
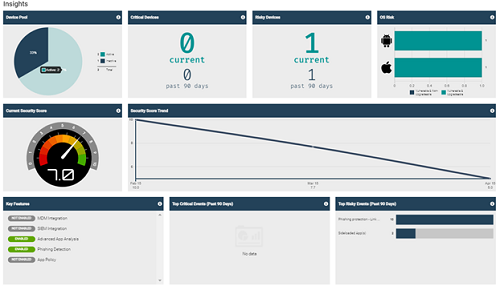
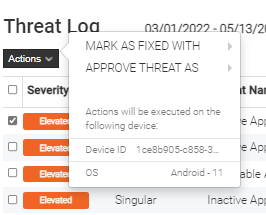
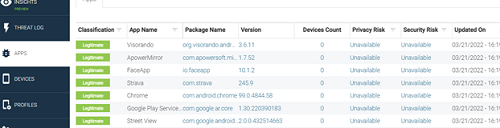
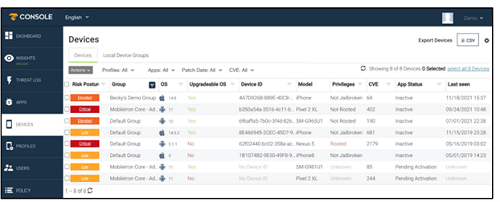
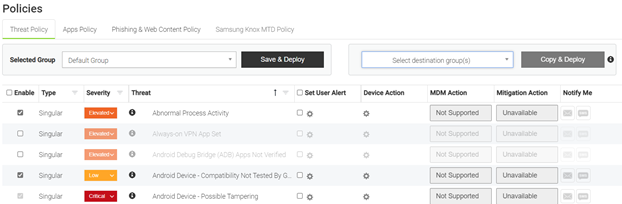
Through the MTD portal, you can access dashboards and reports from the end users for which the MTD option is active. The portal also allows you to configure your organization's security policies. You can download the user manual in Dutch(PDF, 3 MB, in Dutch) or French(PDF, 3 MB, in French) or do you prefer a concise explanation? Below we list the main features of the MTD portal:


Once logged into the MTD portal, you will see the dashboard that shows you the most important information about devices of the end users for whom the MTD option is active.

The dashboard gives you an overview of the number of devices, networks and applications analyzed and where a threat was detected. By default, the information is displayed for the last 7 days. If you wish, you can use the dropdown menu to change the period of the timeline.

Do you want to know more about a threat from the list? Click on the icon for more details. What you get to see depends on the privacy settings you previously set. Thus, if set, you can see via the map where the device was when the threat occurred. You will also see the trend in the number of threats over the specified period. Finally, you will see additional statistics that allow you to find out the most attacked users, devices and networks.


The Insights tab gives you more critical information about the security of your end users' mobile devices. By means of the security score you get a global picture of the degree of security, as well as its evolution.

The Threat Log tab provides details about the threats detected on the devices. Below is an overview of the most important details displayed for each threat:

  1. Severity:
    • Critical: a real attack has been detected, your immediate attention as an administrator is required.
    • Elevated: an increased risk has been detected which may lead to an attack.
    • Low: An indication of a risk has been detected that could lead to an attack if the device is vulnerable.
    • Normal: a normal event has been detected which can be a trigger to analyze the possibility of a threat (e.g. change of DNS, proxy,...).
  2. Type:
    • Singular: an individual threat has occurred.
    • Composite: several individual threats have occurred together during a given time period.
  3. Threat Name: Name of the threat
  4. User: the email address of the end user of the device on which the threat occurred.
  5. Group: the group in which the device is located ("default" as standard).
  6. Device: unique ID of the device on which the threat occurred.
  7. State: The state of the threat mitigation (“pending” as standard)
  8. Action: What action triggered this threat
  9. Timestamp: When this threat occurred

Want more details of a specific threat? Click on the threat the details of which you want to see.
After selecting a specific threat, you can take 2 different actions:

  • Mark as fixed with: you can mark the threat as fixed.
  • Approve threat as: you can approve the threat.

After you take action, the status in the Threat log will change.


The Apps tab gives you an overview of the apps the end user has installed on the device.
For each app, you see :

  • the classification (Legitimate or malicious),
  • the name of the app
  • the package name
  • the version
  • how many devices the app is installed on
  • when the information in the MTD portal was last updated.

Privacy and security risk is not shown, since this requires an additional license that is not included in the MTD option. Contact your commercial contact or partnerOpens a new window if you wish to activate this additional functionality.


The Devices tab gives you an overview of all devices for which MTD option is active. Below you will find the most important information displayed:

  1. Risk posture: this field indicates the highest risk level of a given event for the device. For example, if the risk level of a particular mobile device is Elevated and a Critical event is detected, the risk level Critical will be associated with it.
  2. Group: the group to which the device belongs (as a standard value this is the default group).
  3. OS: the operating system, including the version.
  4. Upgradable OS: shows whether the current operating system can be upgraded.
  5. Device ID: Mobile device identifier
  6. Model: model of the device (e.g. iPhone 13, Samsung Galaxy S22, ...)
  7. Privileges: privileges of the mobile device. Jailbroken in iOS (Apple) or rooted in Android (other brands) means that the manufacturer gives you the privilege or access to override software or device restrictions. Removing these restrictions leaves the device vulnerable. Indeed, such a removal allows you as a user to install unauthorized applications or prevents the blocking of certain unsafe URLs or (web) links.
  8. CVE's: the number of CVEs (Common Vulnerabilities and Exposures) of the version of the operating system on the device.
  9. App status: Status of the MTD app (zIPS) on the device
  10. Last seen: Last time there was synchronization between the device and the MTD Platform.

Do you want to export this overview to a CSV file? Click CSV in the upper right corner next to the icon to receive an email with the CSV file attached.

After activation of the MTD option, a welcome email is sent to both the end users and the administrator(s) of the mobile contract. The welcome email contains an activation link that is valid for 7 days. However, as an administrator, you may need to take action through the Users tab in certain situations:

Your end user has lost the activation link: Choose Copy Link to copy the existing activation link and forward it to the end user.

Your end user reports that the validity of the activation link has expired: First, choose Regenerate Link to generate a new activation link. Then choose Copy Link to copy the activation link and forward it to the end user.

Your end user has changed devices or removed the MTD app from the device: in this case, the MTD option must be reactivated. Contact your Proximus contact or partnerOpens a new window . Then invite the user again to install and activate the MTD app. The user will receive a new welcome email with new activation link.

Please note, do not create new users, delete users or change the profile of existing users through the MTD portal. Still want to add, delete or change user profiles? Then contact your Proximus contact or partnerOpens a new window .

In the Policy tab, as an administrator, you can set the security policy for security threats. Please note that the Apps Policy and Samsung Knox Policy do not apply.

Threat Policy

In the Threat Policy tab, you can define which notifications or detections you want to activate for the different threats. You can do this by checking the box in the “Enable” column next to the relevant threat.

Furthermore, you can:

  • adjust the risk level of a threat,
  • set an alarm for the end user,
  • define a desired action of the device,
  • Have a notification sent via email or SMS to yourself when this threat occurs on the device of one of your end users.
Phishing & Web Content Policy

Phishing is a form of Internet fraud. Fraudsters try to lure someone to their website via a false (web) link in order to extract personal information and scam them. In the Phishing & Web Content Policy tab, you can determine if you want to protect your end users against this type of fraud. Or you can also filter what web content they can or cannot access through their device. If you have defined multiple groups, you can adjust these settings for each group.

If you check Phishing Protection, you have the option to indicate in what way you want to protect your users from phishing.

  • Enable content inspection on remote server: this check will generate an additional remote check for possible phishing URLs in addition to the analysis performed by the device.
  • Enable Phishing Protection and activate zIPS URL sharing: checking this allows your end users to share the (web) link with the MTD App to check its trustworthiness. They do this by long pressing the URL or web link on their device.
  • Enable Phishing Protection and activate zIPS local VPN: by checking this, a local VPN will be started on your end user's device. VPN is like a virtual private network that encrypts your internet connection to safely analyze possible phishing URLs.
  • Allow User Control: by checking this, your end users can turn on or off phishing protection themselves on their device.
  • Block Detected phishing URL's: by checking this, detected phishing URLs will be blocked on your end user's device.

Want to give certain (web) links a custom category to exclude them from a phishing categorization, for example? Click Manage List to create Access Control Lists or lists of domains you want to categorize as secure.

If you check Enhanced Phishing Protection and Web Content Filtering, in addition to the category, you can also determine what action should be taken if the end user wants to retrieve this web content.

In the OS Risk tab, you get an overview of all vulnerabilities (CVEs or Common Vulnerabilities and Exposures) of the operating system on your end user's device. You will also see how many devices are vulnerable and which of them can be updated.

In the Manage tab, you can adjust various settings. We list the most important settings below:

  1. General: adjust the general settings, such as the password policy for logging into the MTD Portal. Choose the language of the MTD portal, customize the visualization of certain items in the MTD App (Danger Zone, App Risk Lookup, Privacy Summary). And finally, set the policy regarding inactivity of the MTD App on your end users' devices.
  2. Privacy: adjust privacy settings regarding what data is shared from the MTD App (zIPS) with the MTD platform for judicial purposes.
  3. Network Sinkhole settings: determines which IP addresses, domains or countries are allowed or blocked when certain threats occur, as defined in the Threat Policy.
  4. Audit Logs: gives you an overview of various activities on the MTD platform, such as creating and logging into administrator accounts and changing policies.
  5. Roles: do not modify the roles. If you do, certain accesses to the platform may no longer work correctly.
  6. Message Templates: do not modify the Message Templates. If you do, certain features of the platform may no longer work correctly, such as giving users access again.
  7. Whitelisting: In this section you can whitelist digital certificates, Wi-Fi access points or applications. Whitelisting means that you consider them trustworthy and thus make them accessible. In case of whitelisting, the detection of related threats defined in the Threat Policy will be suppressed.
  8. Access Control List: in this section you can define lists that can be used in the Phishing & Web Content Policy.

Clicking on this will take you to the Proximus MTD support page. If as an administrator you do not find an answer to your question on this page, please contact your Proximus contact or partnerOpens a new window . Please note that we do not provide support in case of jailbroken or rooted devices. Jailbroken or rooted is the case when the end user has hacked or cracked the device to gain access to the software.


FAQ's


When creating your account on the MTD portal and resetting your password the message appears that the link has expired ("your link has expired. Please obtain a new reset password link"). Your activation link is valid for 24 hours by default. Did you exceed that deadline? Then contact another administrator within your organization and ask for a new activation link. Are you the only administrator in your organization? Contact Proximus contact or partnerOpens a new window and ask for a new activation link.

You want to give one or more end users administrator rights or remove administrator rights for one or more administrators? To do this, contact your Proximus contact or partnerOpens a new window . This will remove the existing MTD option for the end user and activate a new MTD option with custom permissions.

The MTD option is linked to a mobile number. You can only secure the mobile device linked to this mobile number. If your user changes device, you need to send out a new activation link as described in Users.

This means that you have activated the phishing policy, but not the corresponding detections. To do this, go to Threat Policy in the menu and check the following threat detections:

  • Risky Site - Link Tapped
  • Risky Site - Link Visited
  • Risky Site - Blocked
  • Site Blocked
  • Site Blocked - Link Tapped
  • Site Blocked - Link Visited