Add your domain to Office 365
Want to use your domain name for your e-mail address and other services? Add it to Office 365. The wizard will guide you through the process in three steps.
Before you get started
This process includes steps in which you must add records to your DNS host.
- Do you have a domain name with Proximus? In that case, a screenshot of the records will suffice: e-mail it to dnsmaster@proximus.com.
- Do you have another host? Look up the contact details of your host for help if necessary.
Would you like a single point of contact for your domain and Office 365 in the future? In that case you can transfer it.
- Log in to Office 365, click on the
 menu and click on Administrator.
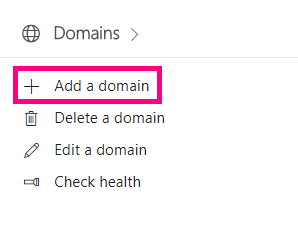
 - Click Domains in the left column. Choose Add domain in the following screen.
Verify your domain:
- Fill in your domain name.
- To prove that this is indeed your domain, you will need to add records to your DNS host. Copy the data in the column with the TXT Value header.
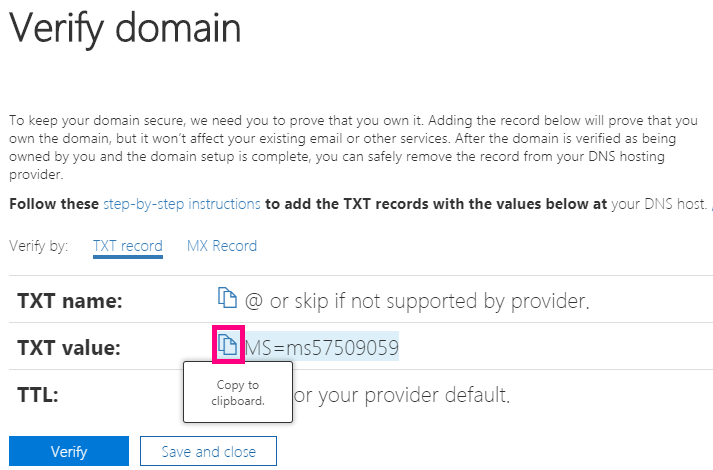
- Office knows automatically where your DNS host is: click the link with the name of your host and add the TXT record. Go through the Step-by-step instructions for adding a TXT record or contact your DNS host for help.
- Have the records been added? Click Yes, I've added the record and then click Next.
Update your e-mail addresses:
- Click Update selected users and click Next.
- You must log out to continue the process.
- Log in again, but do so using the updated e-mail address. Your password remains the same.
- You can now add new users. Don't need to? Click Skip this step.
Update your DNS records:
- Click No, I have a website and then click Next.
- Select the services you want to use and choose Next.
- Copy the MX records and add them to your DNS host. Then do the same with the other records. Click Step-by-step instructions for adding a record at the top in each column, or contact your host for help.
- Have the records been added? Click Yes, I've added the record and choose Finish.
Done! You can now send and receive e-mails with your business address via Office 365.
Want more information? Then be sure to watch Microsoft's online video.