- In the 1st tab, add the details for the employees you want to give access to VMS.

Language will determine the language of the interface in MyProximus, you will not be able to change it unless you contact the VMS administration again. There are 2 different profiles: administrator or user. An administrator will always have to define rights for a user. - Send the form to the VMS administration.
- Once you’ve received the login details from the VMS administration, log in to MyProximus with an administrator account.
- Click on Products and Number Management.
- Click on Administration in the top menu.
- If you have not created a user profile before, click on User Profiles in the left menu and New. Give your new profile a name, check the rights you want to give the user and click Save.
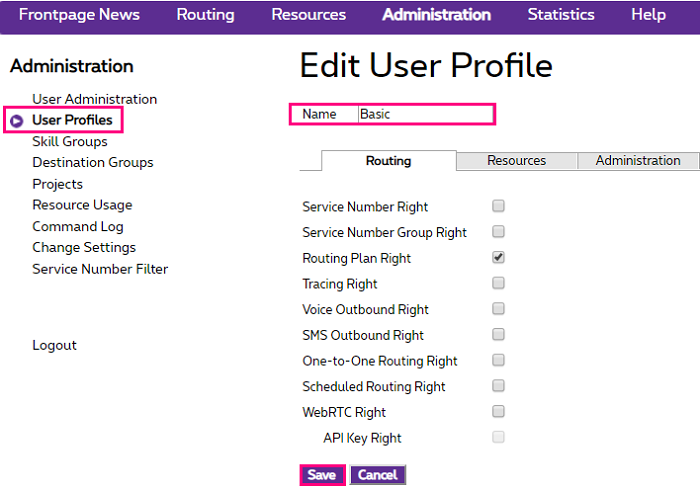
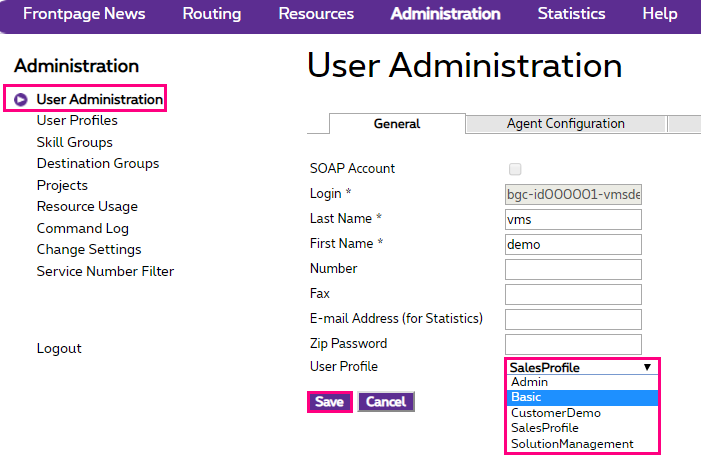
- Click User Administration in the left menu. Click on the name of the user you would like to assign a new profile to.
- In the User Profile field, select the profile you just created and click Save.
- Your user will now be able to log in with the given rights.
Manage the routing of your numbers
Do you have Voice Managed Services (VMS) and do you want to ensure that your customers' calls to a specific number are routed to the right operator, while playing your own interactive voice menus? In MyProximus, you can view your VMS numbers, create a new routing plan, customize it in the editor and create your own reporting.
You are interested in ordering VMS? You can download the contractual service description and order form.
Management in MyProximus
Log in to MyProximus and click on Products and Number Management.
You don’t have a MyProximus account yet or you want to create or delete VMS numbers? Download the form and send it to the VMS administration.
-
-
- In the 2nd tab, fill out the numbers you would like to add or remove. Select C to create a new VMS number and D to delete a VMS number. You can indicate a destination number (e.g. 02xxxxxxx) where you would like this number to be routed. A simple destination based routing will be put in place for the new number then.

- Send the form to the VMS administration.
- Once you’ve received the login details from the VMS administration, log in to MyProximus with an administrator account.
- Click on Products and Number Management.
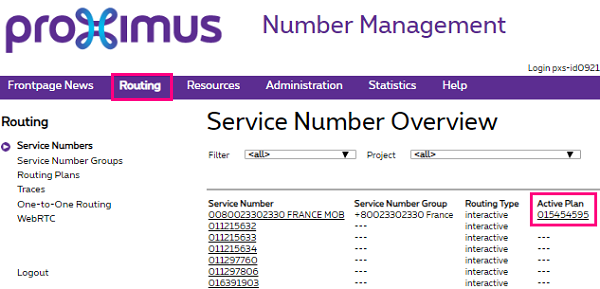
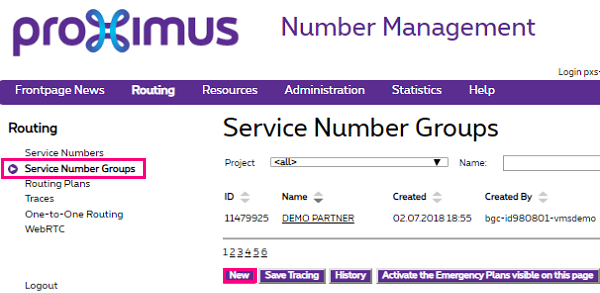
- Click on Routing in the top menu and on Service Numbers in the left menu to get an overview of all your VMS numbers.
- In the 2nd tab, fill out the numbers you would like to add or remove. Select C to create a new VMS number and D to delete a VMS number. You can indicate a destination number (e.g. 02xxxxxxx) where you would like this number to be routed. A simple destination based routing will be put in place for the new number then.
Below we will explain the basics of routing plans and you can also find a complete manual in MyProximus under Products > Number Management > Help.
Do you need a more advanced course? We offer a half a day theoretical course or a full day theoretical and practical course. Contact us for pricing.
Routing plans
We recommend that you read the explanations chronologically as you will need to know how to route to a single destination before creating more complex routing plans or apply features like call limiters or queuing.
-
- Log in to MyProximus with your username and password.
Log in to MyProximus Opens a new window - Click Products and Number Management.
- Click Routing. You will see all the service numbers here that are assigned to you as a customer. Active plan shows if a routing is already assigned to a number.
- Click Routing Plans in the left menu and click New on the bottom of the page.
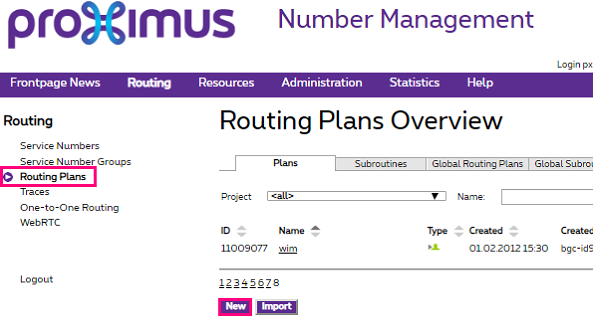
- In the Name field, enter a name for your routing plan and click Save.
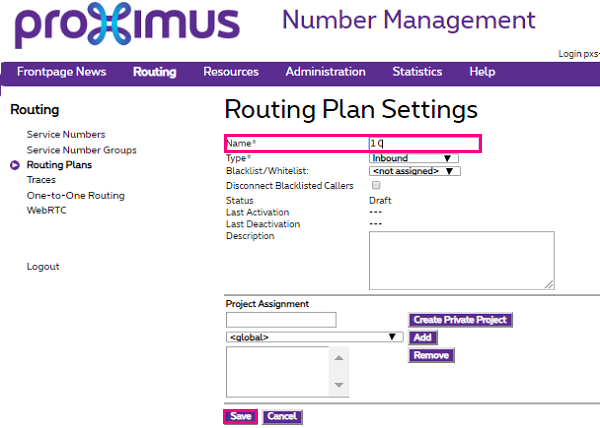
- Click Routing Plans again and click on the name of the routing plan you just created. You are now in the routing plan editor and ready to create rules and destinations for your new routing plan.

- Log in to MyProximus with your username and password.
-
You can create very simple or very complex routing plans in the editor, we will just describe the a few features that will get you started:
- Destination: will send all calls to a single destination.
- Origin: will send calls from an origin (ex. your office in Brussels or Antwerp) to a chosen destination.
- Time: will send calls during a specific timeframe (e.g. during office hours) to a chosen destination.
- Interactive Voice Menu (IVR): allows you to play audio messages to enable the user to make a specific choice or listen to announcements.
- Call limiter: limits the number of calls sent to a destination.
- Queuing: allows you to queue calls for a destination.
-
- Once you’ve opened your routing plan in the editor, right click the ? icon on the right, select Replace and choose Destination.
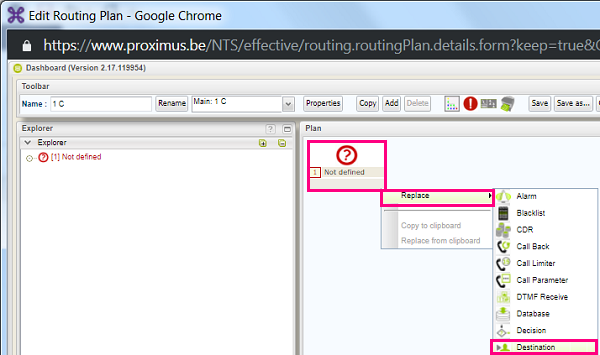
- Click on the Destination icon. In the Properties field on the left, click Mode. In the Mode field, choose External Phone Number. We will enter the full destination number and not choose a number from the phonebook.
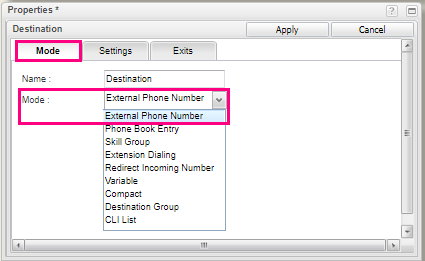
- Click on Settings and type the destination number in the Number field. Click Apply.
- Click Save on top of the window. You will now see the number under the destination icon on your right. You can close the page now.

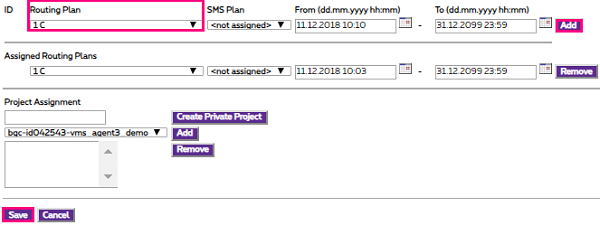
- Click on Service Number Groups and New. As the same routing plan can be applied to several numbers, it is actually a service number group that will be linked to the routing plan.
- In the Name field, enter a name for your service number group. Choose one or more available numbers and add them to your service group using the -> icon.
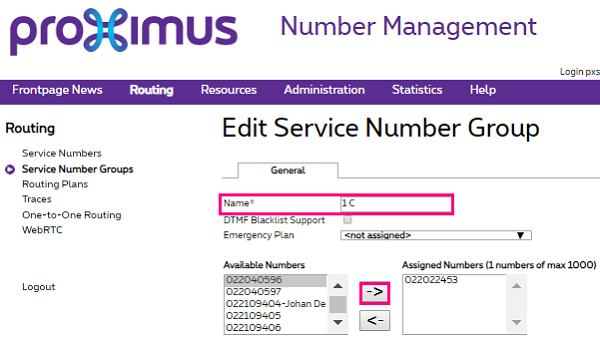
- Choose a Routing Plan from the dropdown menu and click Add. Now Save your service number group.
- Under Service Number Groups, you will now see that the service group you created has an active plan.

- Once you’ve opened your routing plan in the editor, right click the ? icon on the right, select Replace and choose Destination.
-
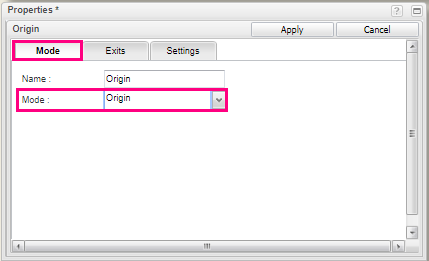
- Once you’ve opened your routing plan in the editor, right click the ? icon on the right, select Replace and choose Origin.
- Click on the Origin icon. In the Properties field on the left, click Mode. In the Mode field, choose Origin. We will simply route calls based on the origin of the calls, but you could also route them based on the phone numbers (CLI’s) they are made from. If you wish, you can define another name for your origin.
- Click on Exits. Let’s say that we would like to route calls coming from Brussels, Antwerp and Namur to different numbers. In that case, we define a label for each location. Please note: We will also activate each exit by clicking the number in front of the label. Green numbers are in use, while red numbers are not being used.
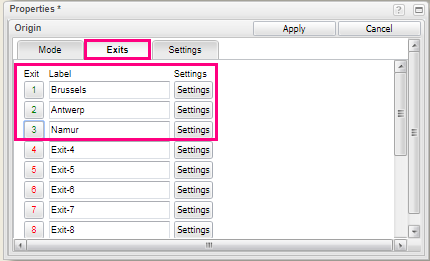
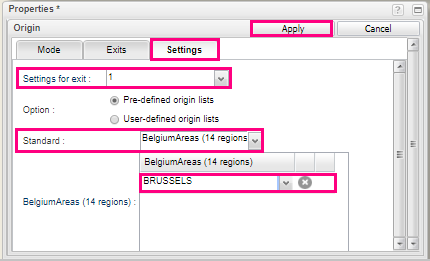
- Click on Settings and select a value from the Standard dropdown menu. Press the + icon to add the corresponding value. Repeat this step for each exit that you defined in the previous step. When you’ve configured all exits, click Apply.
- We now have 3 origins and a default routing named Rest.
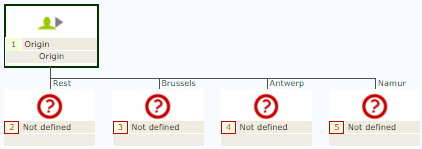
- A destination still needs to be configured for each of these origins. In case you haven’t done so yet, read the instructions to configure a destination above to set a destination for each origin.
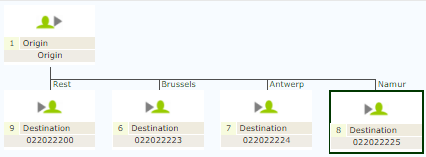
- Each call coming from a different area than Antwerp, Brussels or Namur will be routed to 02/2022200. All other calls will be routed according to their originating area.
- For each destination, it is also recommended to configure what happens in case of no answer, busy, etc. Click on the icon of each destination and click on Exits in the Properties. Make sure that all scenarios you would like to cover are marked On and click Apply.
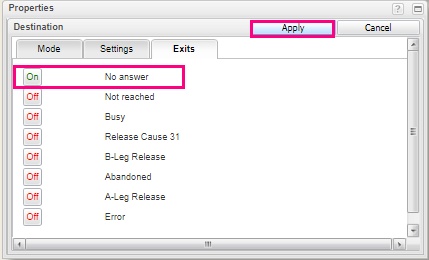
- A new route will be created for each scenario. In this case, we made sure that all calls that are not answered by our office in Brussels are routed to our main “Rest” number.

- Once you’ve opened your routing plan in the editor, right click the ? icon on the right, select Replace and choose Origin.
-
- Once you’ve opened your routing plan in the editor, right click the ? icon on the right, select Replace and choose Time.
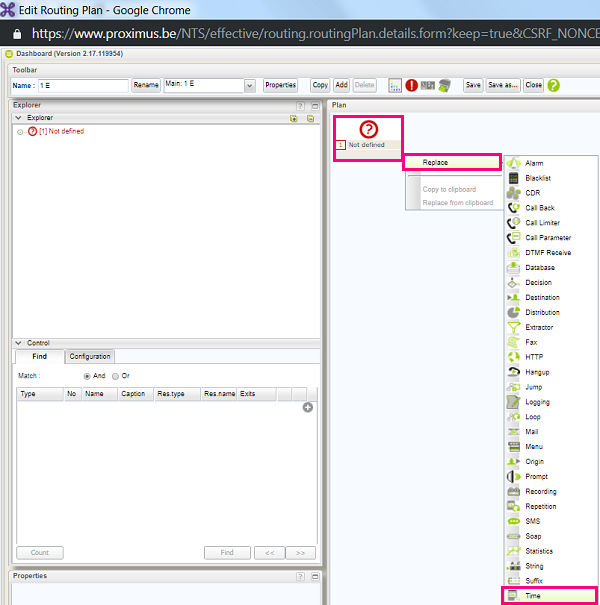
- Click on the Time icon. In the Properties field, click Exits. In this example, we would like to send calls during office hours to a specific number. Please note: Don’t forget to activate each exit by clicking the number in front of the label. Green numbers are in use, while red numbers are not being used. Calls outside office hours will use the default routing Rest that is automatically created by the system.

- Click Settings. Select an exit and select a desired time and/or date. Repeat this step for every exit you have configured in the previous step. When done, click Apply.

- A destination still needs to be configured for each of these timeframes. In case you haven’t done so yet, read the instructions to configure a destination above to set a destination for each origin.
- Calls between 9:00 and 18:00 will be routed to 022022221 and all calls outside these hours will be routed to 022022200.

- Once you’ve opened your routing plan in the editor, right click the ? icon on the right, select Replace and choose Time.
-
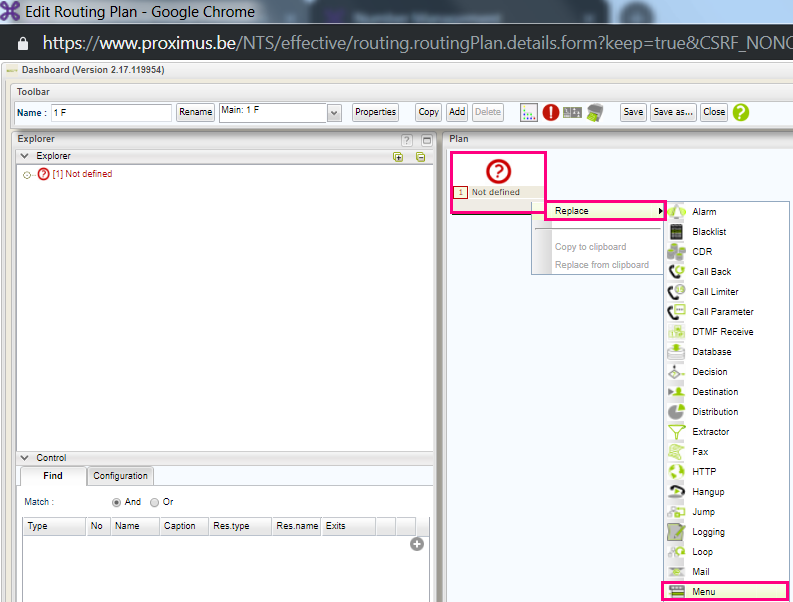
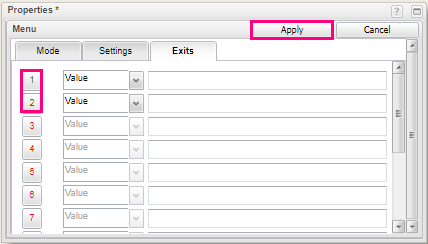
- Once you’ve opened your routing plan in the editor, right click the ? icon on the right, select Replace and choose Menu.
- Click on the Menu icon. In the Properties field on the left, click Settings. In this example we will play a message asking the user to make a language choice between Dutch and French. Select the audio message you will like to play from the Prompt dropdown menu.
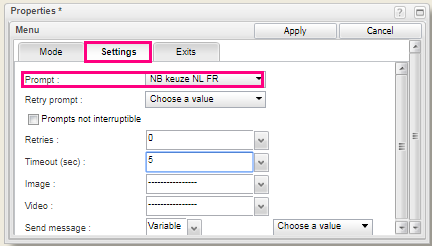
- Click Exits. In this case we’ll enable 2 exits are there are 2 language choices we’d like to route to a different number. Click on Apply.
- Once you’ve opened your routing plan in the editor, right click the ? icon on the right, select Replace and choose Menu.
-
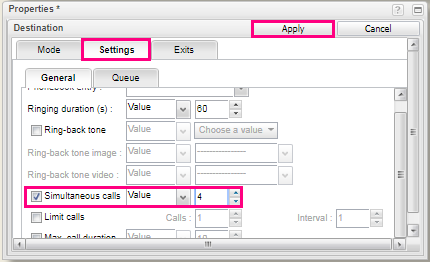
Click on one of the Destination icons you’ve created in your routing plan. In the Properties field on the left, click Settings. You now have 2 options:
- To limit the number of simultaneous calls, checkmark the Simultaneous calls option and set the number of calls. In this example only 4 simultaneous calls are allowed. Click Apply.
- To limit the number of calls within a certain timeframe, checkmark the Limit calls option and set the number of calls and the interval. In this example only 3 calls will be accepted within 20 seconds. Click Apply.
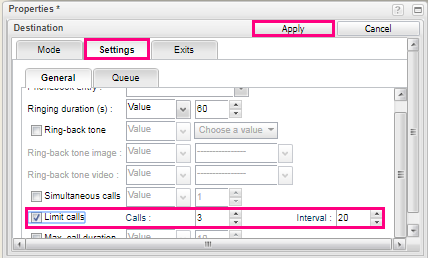
You can queue the calls that exceed your call limitations.
- To limit the number of simultaneous calls, checkmark the Simultaneous calls option and set the number of calls. In this example only 4 simultaneous calls are allowed. Click Apply.
-
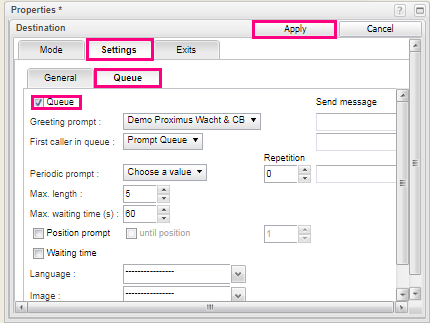
Click on one of the Destination icons you’ve created in your routing plan. In the Properties field on the left, click Settings and then Queue.
Checkmark Queue, set the audio files you’d like to play and click Apply:
- Greeting prompt: plays an audio file when entering the queue (e.g. an announcement of waiting music).
- First caller in the queue: plays an audio file when you are the first person in the queue (e.g. you are the first person in queue, someone will be with you shortly).
- Periodic prompt: plays an audio file every X seconds (e.g. our employees are still occupied, please be patient).
- Position prompt: announces the position in the queue.
Resources and reporting
You can add your own resources to customize it to the needs of your company or create reports that will provide insights.
-
These include:
- Blacklists/whitelists: in certain scenarios you can choose to allow or block a list of phone numbers, e.g. only VIP customers can call a certain phone number.
- Origins: you can define your own origins, e.g. calls coming from a certain area.
- Time periods: define certain hours, e.g. office and out-of-office hours.
- Prompts: audio files you would like to play in Interactive Voice Menus (IVR), e.g. waiting music, announcements and menu choices.
- Phone book: you can add your contact numbers to the phone book.
- Mails: you can add templates that can be sent via e-mail.
- SQL tables: you can add your own variables.
- Extension dialing: you can link an extension to a phone number you’d like to call.
We’ll explain how to add a custom audio file. If you are recording your own audio files, please use these settings:
- Format: .wav file
- Type: A-law
- Sample rate: 8000 Hz
- Sample format: 8 bits
- Mono
Then follow the steps below:
- Log in to MyProximus with your username and password.
Log in to MyProximus Opens a new window - Click Products and Number Management.
- Click Resources and then Prompts in the left menu. Click New to add a new file.
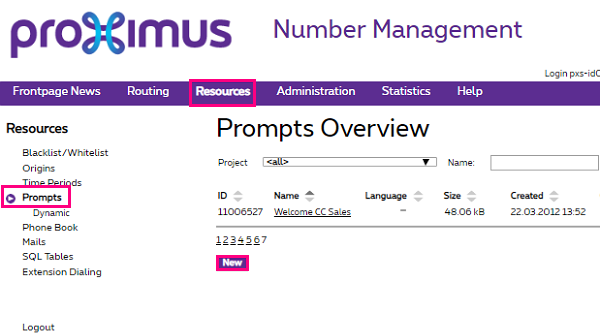
- Choose a name, file and click Save.

- Your audio file will now appear in the list of prompts and can be used in any of your routing plans.
-
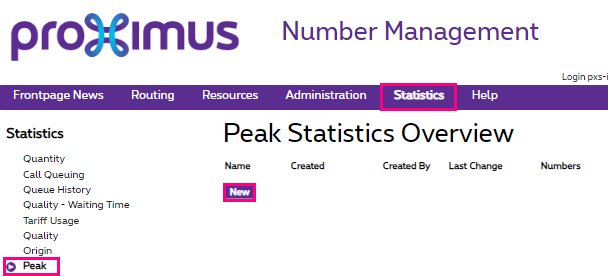
- Log in to MyProximus with your username and password.
Log in to MyProximus Opens a new window - Click Products and Number Management.
- Click Statistics. Different statistics are available. Let’s create a report that shows the maximum number of simultaneous calls for a given period. This is useful to estimate how many agents are needed to staff your contact center. Click Peak and New.
- Choose a name for your report, service numbers and time period for your report and choose a format in which you’d like to export your report. Optionally, you can choose to e-mail the report on a one-time or regular basis to certain users. Click Save.
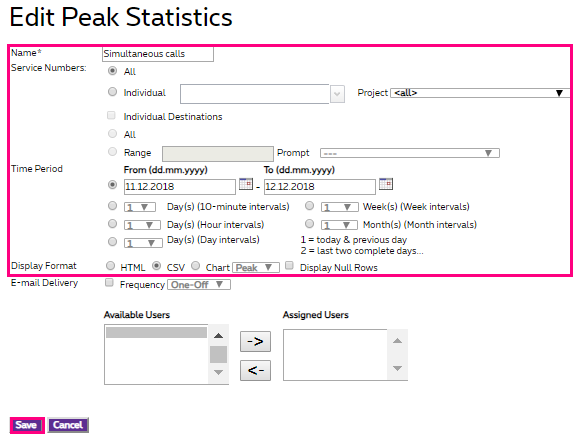
- Click on Report to generate the report you just created.
- Log in to MyProximus with your username and password.
Troubleshooting
Below you can find an overview of the most common issues.
-
This is probably because your administrator has not given you the user rights to access these options.
Consult your administrator and ask him to review your user rights under Click on Products > Number Management > Administration > User Profiles. Make sure the options you need to access to are checked.
-
Click on Routing and Service Number Groups. Checkmark Trace CLI and enter the phone number (e.g. 0479123456) you will test with. Make a few test calls and go to Routing and Traces. There you can see the logic of what exits were taken and which conditions were met, which provides insight for easier troubleshooting.
Tips:
- If you would like to know what is in your (system or user) variables, let VMS send an e-mail to your mailbox where those variables are present.
- If you open a trace and search (ctrl + f) for ‘icon’, it is a lot easier to see lines related to an icon.
Are no traces available after you’ve made a few test calls? Make sure your administrator has checked tracing right for your user profile under Products > Number Management > Administration > User Profiles. If still no traces are available after making a few test calls, send an e-mail to the VMS administration or call 0800 10 800.
-
The language is taken into account when playing prompts. It is usually predefined by the system. In the routing plan, the language can be set or overwritten. Possible values are:
- en: for English,
- de: for German,
- nl: for Dutch,
- fr: for French,
- bi: for bilingual.
Bi can only be set by the system but not in the routing plan. The value means that the announcement is spoken randomly in Dutch and French or French and Dutch. It can be overwritten in the routing plan.
-
The time icon always picks the first condition that matches, but it is not always the best match.
For example, if you specify opening hours on exit 1, closing hours on exit 2, a holiday list on exit 3, then the holiday list will never be matched as a condition as it will match either exit 1 or exit 2.
Instead, use something like this:
1. Holiday list
2. Customer defined list (e.g. numbers that are whitelisted)
5. Opening hours
8. Closing hoursThis is a correct flow that allows to edit or insert something between opening and closing hours for example.
-
This is mostly likely due to the fact your VMS access number is an ISDN (BRA) number. An ISDN number arrives at our platform via the INAP protocol and not via the SIP protocol. Parallel ringing is only possible via SIP and not via INAP.
If you need parallel ringing, contact us so we can change your line type.
-
Check if all exits of the skill group are set and destinations are defined for them:
- No answer
- Not reached
- Busy
- Overload
- Release cause 31
- Abandoned
-
CDR’s are created at midnight. They will be send by e-mail or will be available for download on when clicking Products and Number Management.