Manage Explore Next Generation Firewall

Want to set up your own personalized firewall protection? We’ll explain you the basics to set up your Explore Next Generation Firewall.

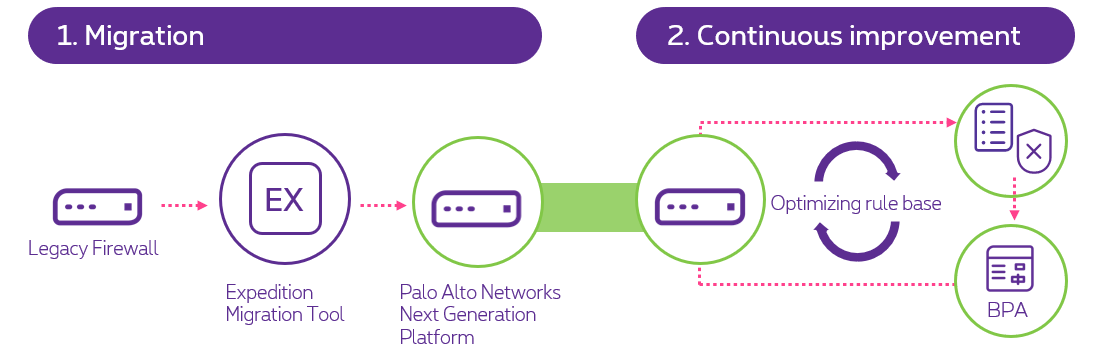
Explore Next Generation Firewall uses Palo Alto Networks’ firewall, application control, advanced threat protection, IPS, URL filtering and SSL teleworking. Download the PDF manual(PDF, 4 MB) .


Get started

We’ll explain you how to log in and give an overview of the most important features.

Contextual help is also available in the interface of your firewall by pressing the blue ? Help icon.

To access the configuration settings is only possible from inside your Explore network:

  1. Surf to Explore Next Generation FirewallOpens a new window
  2. Enter the credentials provided to you by Proximus and click Log In. Note that the username and password are case sensitive, make sure you type them correctly.
  3. After the authentication, you will be prompted by a welcome message. After closing the welcome message, you are taken to the Application Control Center (ACC).

We strongly recommend to change the default password provided by Proximus. Please follow the procedure on how to change your password.

Before getting started, you should know that changes do not take effect immediately. To apply changes, you must click on Commit in the upper right corner of the web interface.

Click the Commit button again to confirm your changes.

The interface of your firewall has 6 tabs:

  1. Application Control Center (ACC): provides actionable intelligence on your network activity.
  2. Monitor: provides firewall reports and logs of your network activity.
  3. Policies: configure firewall policies (e.g. security, NAT, forwarding, QoS, authentication, application overrides, etc.).
  4. Objects: configure elements (such as objects or security profiles) you can use with policies.
  5. Device: configure basic system settings and maintenance tasks. Most tasks can only be performed by Proximus.

We recommend you to use the contextual help to learn more about the different elements present on the page you are watching.

The ACC shows an overview of all activity. Each of its tabs contain widgets.

You can easily add a widget by pressing the pen icon 
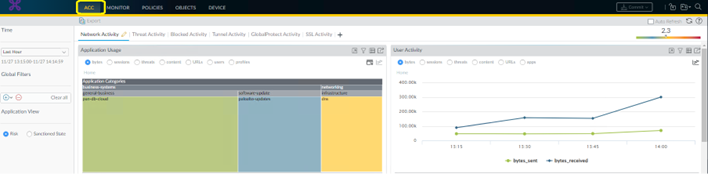
on the tab name or remove it by pressing the black X icon on the tab name.

Network activity

You will see an overview of network traffic and user activity here. The main widgets are:

  • Application usage: top 10 of network applications used. Applications that are not in the top 10 are bundled as other. The graph shows all applications by category, subcategory and application. Use this to monitor applications with high bandwidth usage, session counts, file transfers, threats and URLs accessed.
  • User activity: top 10 of most active network users in terms of traffic and network resources. Use this to monitor usage sorted on bytes, sessions, threats, content (files and patterns) and URLs visited.
  • Source IP activity: top 10 of IP addresses or hostnames of devices generating network activity.
  • Destination IP activity: top 10 of IP addresses or hostnames accessed by network users.
  • Rule usage: top 10 of rules that have allowed the most network traffic. Use this to monitor the most used rules and usage patterns and if they are effective in securing your network.
Threat activity

You will see an overview of the threats on your network here, based on signature matches in antivirus, anti-spyware, vulnerability protection profiles and viruses reported by Wildfire.

Blocked activity

You will see all blocked traffic towards your network here. The main widgets are:

  • Blocked application activity: shows applications that were denied on your network, as well as threats, content and URLs.
  • Blocked user activity: shows blocked user requests based on a match by an antivirus, anti-spyware, file blocking or URL filtering profile attached to a security profile rule.
  • Blocked threats: shows blocked threats based on antivirus, vulnerability and DNS signatures.
  • Blocked content: shows files and data blocked by a file blocking or data filtering security profile that is part of your policy.
  • Security policies blocking activity: shows security policy rules that blocked or restricted traffic based on threats, content and URLs that were denied access. Deny rules defined in your policy are excluded. Use this to monitor the effectiveness of your policy rules.

In the Monitor tab, you can see all your logs:

  • Traffic: shows all traffic on your firewall.
  • Threats: shows all security alarms (e.g. virus, malware, URL filtering, Wildfire, etc.). For some, you need a Proximus Advanced Security pack, an extra option.
  • User-id: shows events related to the Palo Alto UserID function.
  • Systems: shows configuration changes, including Proximus interventions.
  • Authentication: shows authentication events (e.g. teleworking, Palo Alto UserID, etc.).
  • Unified: shows a collective log of traffic, threats, URL filtering and Wildfire submissions. This way you can easily filter and compare the logs you are interested in.

You can create your own reports here that the firewall generates immediately or on schedule. Follow these steps:

  1. Click on the Monitor tab.
  2. Click on Manage custom report.
  3. Click Add and choose a name for your report.
  4. To use or edit an existing template, click Load Template and choose a template.
  5. Choose a Data Base to use for the report.
  6. Check the Scheduled box and define your filters: Time Frame, Sort By order, Group By preference, and select the columns you want to show in the report. Optionally select the Query Builder attributes to refine the selection criteria.
  7. Click Run Now to test your report. Change the settings as needed.
  8. Click OK to save your custom report.

Proximus is in charge of updating and upgrading the Next Generation Firewall. Proximus automatically keeps the 50 previous configurations (version/commit) of the Next Generation Firewall.

Availability times are included in the SLA for the Explore Internet service. Only HA configurations (Gold SLA option) in Active/Passive mode are fully redundant and allow a very high availability of the service. These configurations are available on all versions and are generally associated with a Gold SLA for connectivity and the Next Generation Firewall.


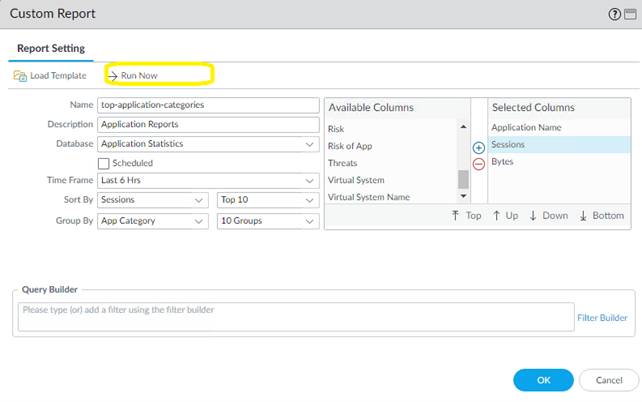
Policies, objects & security profiles

Policies

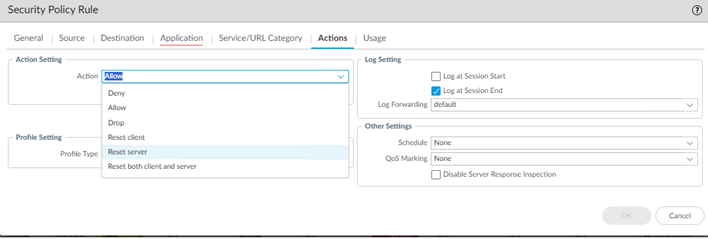
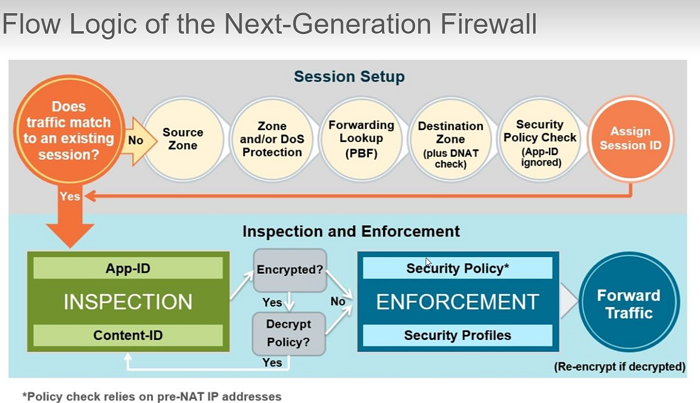
Policies are controls that enable you to allow, restrict, and track traffic based on the application, user, user group or service (port and protocol). You can define your security rules, but also NAT, application override and authentication policies here.

Your firewall uses packet inspection and an application signature library to distinguish applications (by protocol or port) and to identify malicious applications using nonstandard ports.

For maximum safety, use security policies for specific applications or application groups rather than, for example, a single policy for all port 80 connections. For each application, you can block or allow traffic based on source and destination zones and addresses (IPv4 and IPv6). Each policy can also have security profiles against viruses, spyware, etc.

By default, Proximus configures some policies that cannot be changed or deleted to ensure basic connectivity is always present and proposes some other standard policies to provide an initial access to Internet. You can modify them or create your own policies next to them to manage your traffic.

  • Default Web Access: This rule will allow most commonly known applications to the Internet.
  • Blocked High Risk applications: This rule will block applications that are known to present a high security risk.
  • Accept All rule: this rule will allow all remaining traffic not matched by the previous rules. It is there to ensure full connectivity once the firewall is put in service on your network and should be removed as soon as possible.

If you have subscribed to the ‘Advanced Security’ service, a set of security profiles are linked to this policy to protect you from viruses, spyware, etc.

The URL filtering profile could also be configured to better suit your needs.

Before you get started, make sure you create all the necessary objects (e.g. IP addresses) and security profiles (e.g. a URL filtering profile) you want to use in your policy.

To create your own policy, follow these steps:

  1. Click on Policies and Security on left side. Click Add.
  2. In the General tab, choose a name for your policy. As a Rule Type, select universal (default). Optionally, add a tag you created as an object.
  3. In the Source tab, select a Source Zone on the left side:
    • Inside (Explore side): this is the trust zone.
    • Outside (Internet side): this is the untrusted zone.
    • Teleworking: only available if you have subscribed to the teleworking service.
    • Any: your policy applies to all the zones.
  4. In the Source tab, select a Source Address or Source User if you want the policy to apply to a specific IP address or user. If not, leave it set to Any.
  5. In the Destination tab, select a Destination Zone on the left side and a Destination Address or Destination User on the right side, like you did in step 3 and 4.
  6. In the Application tab, choose one or more applications, application groups or application filters you want to safely enable. As a best practice, always use application-based rules instead of port-based rules.
  7. In the Service/URL Category tab, keep Service set to application-default.
  8. In the Actions tab, check these settings:
    • Action: choose the action you want the firewall to take for traffic that matches the rule: allow, deny (denies the application based on how it is configured as an object), drop (drops the application without a TCP reset)., reset client (sends a TCP reset to the client-side device), reset server (send a TCP reset to server-side device) or reset both (client- & server-side device).
    • Log at Session End: this option should be checked.
    • Log forwarding: select default.
    • Profile type: you can either select Profiles to add individual security profiles or Group to select a group of security profiles.
  9. Click OK to create your policy and don’t forget to commit your changes.

Read more about Palo Alto’s NAT implementation and theoryOpens a new window


Palo Alto separates Network Address Translation (NAT) from firewall filtering rules. Therefore, it’s important to understand the firewall’s flow logic to define your policies to use NATIVE or NATed addresses.

NAT rules are based on source and destination zones/addresses and application service (e.g. HTTP). Like security policies, NAT policy rules are compared against incoming traffic in sequence and the first rule that matches the traffic is applied. To ensure traffic is matched, it is therefore very important to organize your NAT rules from more specific to less specific.

  1. The packet enters the firewall.
  2. A check is performed if a session exists. In case of a new configuration, the session does not exist yet.
  3. NAT is inspected for route lookup, but not applied. This is important in case of a static NAT entry! See TYPICAL STATIC NAT FROM INTERNET TO SERVERS example
  4. The firewall policies are checked.
  5. NAT is applied to the packet.
  6. The packet is forwarded.

For an overview of the firewall’s packet processing logic, check the Palo Alto websiteOpens a new window .

To create your NAT policy, follow these steps:

  1. Click on the Policies tab and on NAT. Click Add.
  2. In the General tab, choose a name and description. Add one or more tags you created as an object. Set NAT type to ipv4 (default).
  3. In the Original Packet tab, choose a Source Zone (typically inside) and a Destination Zone (typically outside). Optionally, choose one or more Source Addresses (IP, subnet or pool) that will match the NAT rule.
  4. In the Translated Packet tab, choose the Source Address Translation type (the dynamic IP address and port) and do not change the Destination Address Translation. There are 2 possibilities for the Source Address Translation:
    • Translated Address (if using an IP Pack address): add a least one IP addresses, which can be an address or address group you created as an object. Each entry in the list will be used by the NAT rule sequentially. These addresses must be routed to the outside peers for the NAT to work.
    • Interface Address (if using the IP WAN address): only the loopback.100 can be used for NAT. Do not use the interfaces ethernet1/1 or ethernet1/2 as a NAT address.
  5. Click OK and commit your changes.

Please note: by default, the NAT oversubscription rate differs depending on the VM model. The NAT Oversubscription is the number of times that the same translated IP and port pair can be used concurrently.

Please note: Static NAT rules do not have precedence over other forms of NAT. Therefore, for static NAT to work, the static NAT rules must be above all other NAT rules in the list on the firewall.

To create your NAT policy, follow these steps:

  1. Click on the Policies tab and on NAT. Click Add.
  2. In the General tab, choose a name and description. Add one or more tags you created as an object. Set NAT type to ipv4 (default).
  3. In the Original Packet tab, choose the same Source Zone and Destination Zone (typically outside). Under Service, select the Internet service of your server (e.g. service-http) to avoid all incoming connections being translated. As a Source Address, make sure Any is checked. As Destination Address, enter the Internet address of your server. This is the public IP address used to reach your server from the outside world.
  4. In the Translated Packet tab, do not change the Source Address Translation type and as a Destination Address Translation, provide your static IP address. Optionally, you can specify a port or a range of ports. If no port is specified, the original port will be used.
  5. Click OK and commit your changes.

Please note: your firewall policy rules will apply to the real destination zone. The destination is the public IP address (and port, if translated) of the server, not the internal IP. Read more about Palo Alto’s NAT implementation and theoryOpens a new window for the reasons behind this.

Objects

Objects are elements you can use in your policies or security profiles:

  • Addresses & address groups: IP subnets, ranges or FQDN to use in policies.
  • Applications, applications groups & filters: list of all applications and their details provided and maintained by Palo Alto, to use in policies.
  • Services & Service groups: TCP and/or UDP ports that can be configured to limit an application to certain ports or standalone to use in policies.
  • Tags: a feature that applies to your entire firewall which you can use to refer to specific keywords (tags) instead of objects. E.g. you can define a list of IP addresses that your teleworkers use and name the tag ‘teleworking’. This way you can easily refer to ‘teleworking’ in your policy and know this policy applies to your teleworkers.
  • External dynamic list: import a list of IP addresses, URLs or domain names to use in policies. If you have a Proximus Advanced Security pack, 2 dynamic IP lists are offered: high risk and known malicious IP addresses, which are updated daily.
  • Custom objects: advanced security features configured by Proximus, except for URL categories.
Security profiles

Security profiles are objects we can add on top of the standard firewall inspection. They allow more control and additional security checks to be performed on network traffic.

As best practices, it is recommended to implement the predefined default security profiles. These default security profiles are applied to the standard initial configuration and follow this naming convention ‘Sec_Prof_xx_PM’ (where ‘xx’ is replace by the profile type: AV for antivirus, VP for vulnerability protection, etc.). Those profiles can be applied in the Objects tab under Security Profiles, either individually or as a group profile. Your firewall offers several types of security profiles:

This security profile detects infected files being transferred by one of more applications.

In the Objects tab under Security Profiles, you will find the default Antivirus Profile. This profile checks all the listed protocol decoders for viruses, generates alerts for SMTP, IMAP & POP3 and takes the default action for other applications (alert or deny), depending on the type of virus detected.

You can attach this security profile to your policies. If you have other needs in terms of antivirus compliancy, you can create a customized profile:

  1. Click on the Objects tab and on Security Profiles. Click Antivirus.
  2. Select the Proximus default profile and press Clone.
  3. Make sure Name is selected, uncheck Error our on first detected error in validation and press OK.
  4. Change the antivirus settings to your liking:
    • The Name for your profile (up to 31 characters) is mandatory. It appears in the list of antivirus profiles when defining security policies. The name is case-sensitive and must be unique. Use only letters, numbers, spaces, hyphens, periods and underscores.
    • In the Antivirus tab, you can choose what action needs to be taken for different types of traffic, such as FTP and HTTP. In the Application Exception table, you can define applications that should not be inspected.
    • In the Virus Exceptions tab, you can define a list of threats that will be ignored by the antivirus profile.
  5. Click on OK. To use your new profile, you will need to attach it to a policy.
  6. Click on the Policies tab and click on Security.
  7. Click on the policy you want to apply the security profile to.
  8. Click on the Actions tab. In Profile Setting, click the dropdown next to each profile you want to enable and choose the profile you created.
  9. Click OK and commit your changes.

This security profile detects spyware downloads and traffic from already installed spyware.

You can create a customized profile:

  1. Click on the Objects tab and on Security Profiles. Click Anti-Spyware.
  2. Select the Proximus default profile and press Clone.
  3. Make sure Name is selected, uncheck Error our on first detected error in validation and press OK.
  4. Change the anti-spyware settings to your liking. The Name for your profile (up to 31 characters) is mandatory. It appears in the list of profiles when defining security policies. The name is case-sensitive and must be unique. Use only letters, numbers, spaces, hyphens, periods and underscores.
  5. Click on OK. To use your new profile, you will need to attach it to a policy.
  6. Click on the Policies tab and click on Security.
  7. Click on the policy you want to apply the security profile to.
  8. Click on the Actions tab. In Profile Setting, click the dropdown next to each profile you want to enable and choose the profile you created.
  9. Click OK and commit your changes.

This security profile detects attempts to exploit known software vulnerabilities.

You can create a customized profile:

  1. Click on the Objects tab and on Security Profiles. Click Vunerability Protection.
  2. Select the Proximus default profile and press Clone.
  3. Make sure Name is selected, uncheck Error our on first detected error in validation and press OK.
  4. Change the vunerability protection settings to your liking. The Name for your profile (up to 31 characters) is mandatory. It appears in the list of profiles when defining security policies. The name is case-sensitive and must be unique. Use only letters, numbers, spaces, hyphens, periods and underscores.
  5. Click on OK. To use your new profile, you will need to attach it to a policy.
  6. Click on the Policies tab and click on Security.
  7. Click on the policy you want to apply the security profile to.
  8. Click on the Actions tab. In Profile Setting, click the dropdown next to each profile you want to enable and choose the profile you created.
  9. Click OK and commit your changes.

This security profile classifies, and controls web browsing based on content.

Palo Alto Networks URL filtering solution complements APP-ID by allowing you to identify and control HTTP and HTTPS traffic. When URL filtering is enabled, web traffic is compared to the URL filtering database, which contains millions of websites categorized into about 60 to 80 categories.

Palo Alto provides 2 main ways to do URL Filtering.  Proximus has opted for the PAN-DB URL filtering solution, that is configured via a security profile.  Therefore, do NOT use the Service/URL Category tab, but rather select a profile in the Actions tab.

There are 2 ways to make use of URL categorization:

  • Block or allow traffic based on URL category: you can create a URL filtering security profile that specifies an action for each URL category and attach this profile to a policy. For example: to block all gaming websites, you would set ‘block’ as an action for URL category ‘games’ in the URL filtering security profile. You would attach this profile to your policy for web access.
  • Match traffic based on a URL category to enforce a policy: if you want a specific policy to apply only to web traffic in a specific URL category, you would add the URL category as match criteria when creating your policy. For example: to make sure that streaming websites do not use up all your bandwidth, you would add the URL category ‘streaming-media’ to your QoS policy.

To find what category a website belongs to, look it up on the Palo Alto Networks URL filteringOpens a new window . You can find the complete list of URL filtering categories on Palo Alto’s FAQOpens a new window .

You can configure an URL filtering security profile:

  1. Click on the Objects tab and on Security Profiles. Click URL Filtering.
  2. Palo Alto recommends the ‘default’ profile. Optionally, select the Proximus default profile and press Clone.
  3. Make sure Name is selected, uncheck Error our on first detected error in validation and press OK.
  4. Change the URL filtering settings to your liking:
    • The Name for your profile (up to 31 characters) is mandatory. It appears in the list of profiles when defining security policies. The name is case-sensitive and must be unique. Use only letters, numbers, spaces, hyphens, periods and underscores.
    • In the Categories tab, check the URL filtering categories you want to use. Under Site Access, choose the action you would like to perform (e.g. allow, block, alert, etc.) for each category.
  5. Click on OK. To use your new profile, you will need to attach it to a policy.
  6. Click on the Policies tab and click on Security.
  7. Click on the policy you want to apply the security profile to.
  8. Click on the Actions tab. In Profile Setting, click the dropdown next to each profile you want to enable and choose the profile you created.
  9. Click OK and commit your changes.

This security profile forwards unknown files to WildFire, a cloud-based malware analysis service. It detects and prevents malware by a combination of sandboxing and signature-based detection and blocking.

When your firewall detects an unknown file or link (e.g. in an e-mail), it can forward it for WildFire analysis. Based on the properties, behaviours and activities when analysed and executed in the WildFire sandbox, WildFire determines it to benign, grayware or malicious. WildFire then generates signatures to recognize newly discovered malware that are made available globally every 5 minutes, which can be used by all Palo Alto firewalls to block malware.

You can configure a WildFire analysis profile:

  1. Click on the Objects tab and on Security Profiles. Click WildFire Analysis.
  2. Select the Proximus default profile and press Clone.
  3. Make sure Name is selected, uncheck Error our on first detected error in validation and press OK.
  4. Change the WildFire analysis settings to your liking: The Name for your profile (up to 31 characters) is mandatory. It appears in the list of profiles when defining security policies. The name is case-sensitive and must be unique. Use only letters, numbers, spaces, hyphens, periods and underscores.
  5. Click Add to define which unknown traffic should be forwarded for analysis based on:
    • Applications: forward files for analysis based on the used application.
    • File types: forward files for analysis based on the file type (e.g. PDF files), including links contained in e-mail messages.
    • Direction: forward files based on how they are transmitted (upload, download or both), e.g. forward PDF files only when they are downloaded and not uploaded.
  6. Set the Analysis location to where the firewall forwards files matched to the rule.
  7. Select public-cloud to forwards files to the WildFire analysis cloud.
  8. Click on OK. To use your new profile, you will need to attach it to a policy.
  9. Click on the Policies tab and click on Security.
  10. Click on the policy you want to apply the security profile to.
  11. Click on the Actions tab. In Profile Setting, click the dropdown next to each profile you want to enable and choose the profile you created.
  12. Click OK and commit your changes.

Teleworking

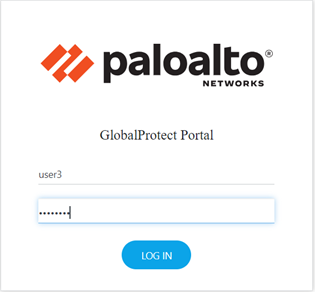
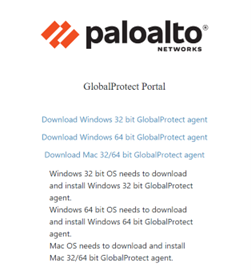
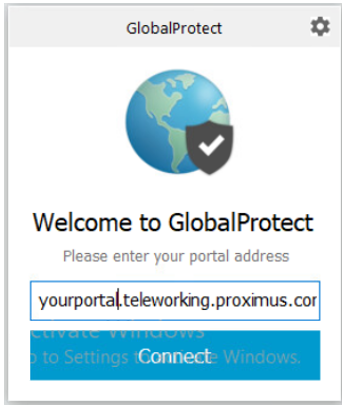
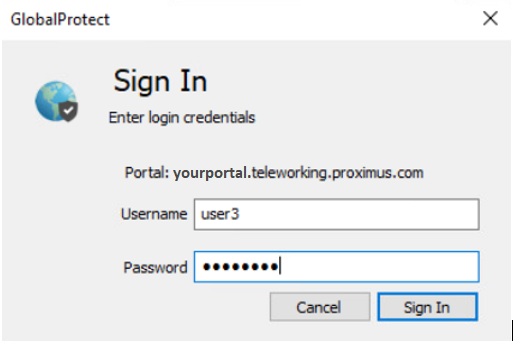
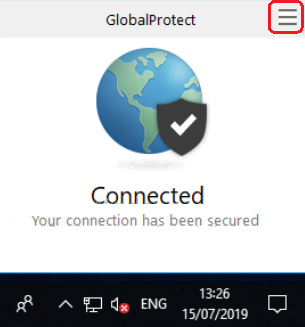
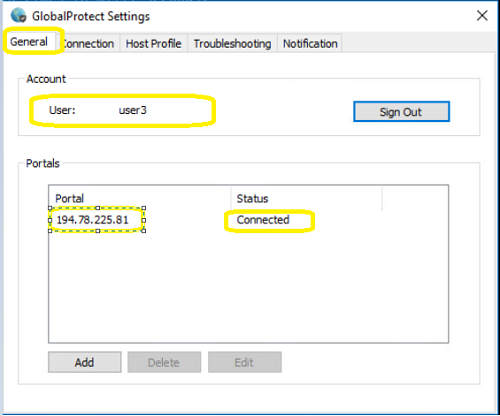
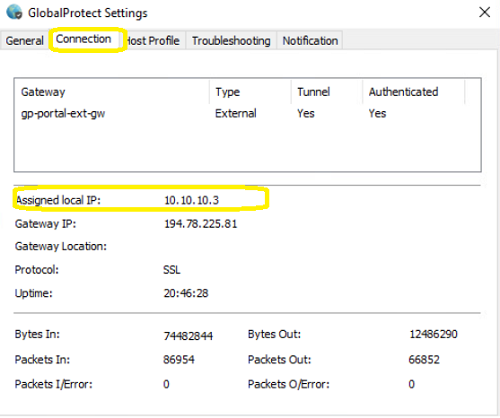
If you have subscribed to this service, you can provide remote access to the users on your network using the GlobalProtect software.

This service is proposed in 2 flavours:

  1. Local users: your teleworking users and passwords are stored locally on the Explore Next Generation Firewall platform, per pack of 5 simultaneous teleworkers.
  2. LDAP/AD: your teleworking users and passwords are defined on an Active Directory. An additional configuration between the firewall and your Active Directory server is required. This flavour is not part of the self-managed package and must be configured with the help of an Explore engineer. If you have any questions about this, contact usOpens a new window .

If you have the 1st flavour, you will find all the information to manage your teleworking users and passwords below.

You can add, delete or change users and passwords:

  1. Click on the Device tab and on Local user DataBase. Click Users.
  2. You now have several options:
    • Add a user: click Add. You can also Clone a user and adapt it to your needs. Choose a name for your user, a password and confirm your password. The password must be at least 8 characters long, include at least 1 uppercase, 1 lowercase, 1 numeric and 1 special character and should not include the username of the user (including reversed). Click OK.
    • Change a user: click on the user you want to change. You can now choose a new name and password following the password requirements above. Click OK.
    • Delete a user: check the user you want to delete and click Delete.

    Please note: the number of users that can connect simultaneously depends on your teleworking subscription. If you need to add more users, contact usOpens a new window .

  3. If you have added a user, you must add it to group of teleworkers afterwards. To do this, click on User Groups on the left side of the screen.
  4. Click on UserGrp_Local_TWK. Click Add and add the users you just created.
  5. Click OK and commit your changes.

Proximus will provide a link to your teleworking portal and your login credentials. Follow these steps to download the GlobalProtect software:

On mobile

Once the download is completed, install the app onto your device.

On PC or Mac

  1. Surf to your teleworking portal on yourportal.teleworking.proximus.com/ and replace ‘yourportal’ by your company’s portal.
  2. Enter the “Teleworker” username and password and click LOG IN.
  3. Click on the link to download the GlobalProtect software for Windows or Mac.
  4. To install the GlobalProtect software afterwards, you must have administrator privileges on the computer you’re installing it to. Double-click the file you just downloaded and follow the steps in the installation wizard.

After you’ve installed the software, you can connect to the gateway:

  1. Double-click the GlobalProtect icon.
  2. Enter your settings in the GlobalProtect application:
    Portal: enter the link to your teleworking portal (e.g. yourportal.teleworking.proximus.com/ where ‘yourportal’ is replaced by your company’s portal) as provided by Proximus.
  3. Click Connect.
  4. Enter login credentials:
    • Username: enter the Teleworker username.
    • Password: enter the Teleworker password.
  5. Click Sign In.

Once you are connected, your connection status is visible when you double-click on the GlobalProtect icon on the bottom right of the computer’s task bar.

Click on the Settings icon on the top right to see more details.

In the General tab, you will see username that is connected, the portal’s IP address or host name and the connection status.

In the Connection tab, you can see the assigned IP address to the Teleworker.

If you encounter issues, verify the firewall policies between the teleworking, inside and outside zones if all required accesses are allowed.


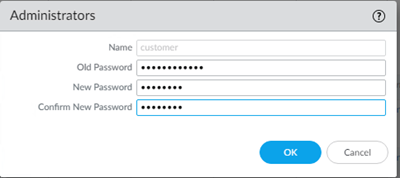
Change or reset your firewall password

Your password can only be changed if you are already logged in. If you can’t log in, contact usOpens a new window to reset your password.

To change your password, follow these steps:

  1. Click on customer at the bottom of the page.
  2. You will have to choose a new password:
    • In the field Old Password, enter current password.
    • In the field New Password, choose a password of min. 8 characters containing at least 1 uppercase, 1 lowercase, 1 special  and 1 numeric character.
    • In the field Confirm New Password, repeat your chosen password and click on OK.
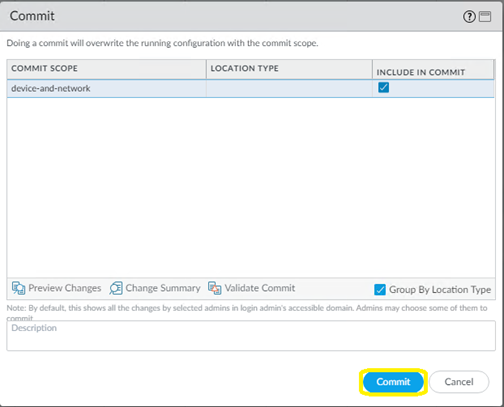
    • Click on Commit on top of the page to confirm your changes.
    • Click on Commit again in the pop-up window that appears.

Your login and password can only be used by you. Proximus has seperate credentials to access the Firewall. If you lose your password, you must contact the Service Desk to request a reset of your password.


Your access rights to features on the firewall

Download an overview of the access rights(PDF, 498 KB) with a list of the features you can see, edit and cannot see on your firewall.


Consultancy and Training

Customers such as you can benefit from our consulting services and training:

As a customer you can rely on our consulting services. Theses services contain a migration and a continious improvement:

Please note, in order to be able to do the migration your existing firewall brand must be on the list of supported vendors: Check Point, Cisco (ASA and Firepower in ASA syntax), Fortinet, Juniper, Forcepoint, ...

  1. Migration:
    • We start with a basic migration from your current firewall rule base to the Proximus NGFW Explore solution.
    • We use automated tools and qualified engineers to achieve the migration.
    • We move from a port-based security policy to an application-based security policy.
    • Don't worry, the security risks of sticking with a port-based policy outweigh the effort required to implement an application-based policy.
  2. Continious improvement:

    After the migration to an application-based security policy it is time for some improvements. Palo Alto has several tools that enable continually optimizing your security rules, a necessity in the ever-changing threat landscape. These improvements are carried out by us:

    • “Policy optimizer”: helps improve individual rules.
    • BPA report: gives an overall view of adherence to Palo Alto’s best practices. The security engineer will run this report after a migration, after a first set of optimizations and after each successive improvement. It gives a great traceability on the improving security posture.

As a customer you can follow a 4 hour training which consists of 3 hours class and 1 hour preparation and follow-up. You can contact your sales contactOpens a new window in case you would like to follow the training.
After the training you will be able to:

  • Create your own security policies via self management.
  • Know how to use the Palo Alto NGFW user interface.
  • Implement changes and new applications and know how to get them configured on your Explore NGFW.

The training is:

  • Customizable based on your needs.
  • Hands-on, no certification needed.
  • Available on your Firewall or online demo portal.
  • Remote by default (Microsoft Teams) but also possible to follow on-site.

Get Help

As a client you can count on us for help via:

Please note: Proximus offers a customized version of Palo Alto’s firewall, so certain features may not be available or looks the same way as described.

Do you need help making changes to the configuration of your firewall? You can easily request Proximus to change you configurationOpens a new window and follow up your request online.

Do you have another question? Feel free to contact usOpens a new window . We're here to help.